Changing the featured image size in WordPress trips people up because the obvious place to look, Settings then Media, does not actually control the featured image. The featured image size is set by your theme, so changing it for real means registering a new size in code and then telling your theme to use it.
I will walk you through the proper way to do it with add_image_size(), when a plugin is the easier route, and the step almost everyone forgets: regenerating thumbnails so your existing images actually update.
Key Takeaways
- Settings > Media does not change the featured image; it only controls the thumbnail, medium, and large sizes.
- Register a custom size with
add_image_size()in your theme’s functions.php, then display it withthe_post_thumbnail(). - The crop parameter decides everything:
truehard-crops to the exact dimensions,falsekeeps the original ratio. - Regenerate thumbnails after any change, or only newly uploaded images will use the new size.
- On a block (full-site-editing) theme there is no single.php; you set the featured image size in the Site Editor template instead.
- If you would rather not touch code, a plugin can register and apply sizes for you.
First, know what each setting actually controls
The reason this feels confusing is that there are two different things called “image size” in WordPress. Settings then Media controls the three default sizes WordPress generates (thumbnail, medium, large), which your content images use. The featured image, though, is displayed by your theme at whatever size the theme registered, so editing the Media settings often changes nothing visible on your featured images.
If you only want to understand which dimensions to aim for in the first place, I covered that in the companion guide on the featured image size in WordPress. This post is about actually changing it.
| Method | What it changes | Best for |
|---|---|---|
| Settings > Media | Default thumbnail, medium, large sizes | Content images, quick tweaks |
| add_image_size() in functions.php | A new custom size for the featured image | A precise, theme-wide featured size |
| Theme or Site Editor settings | How the active theme displays the thumbnail | Block themes and page builders |
| A dedicated plugin | Registers and applies sizes for you | Avoiding code entirely |
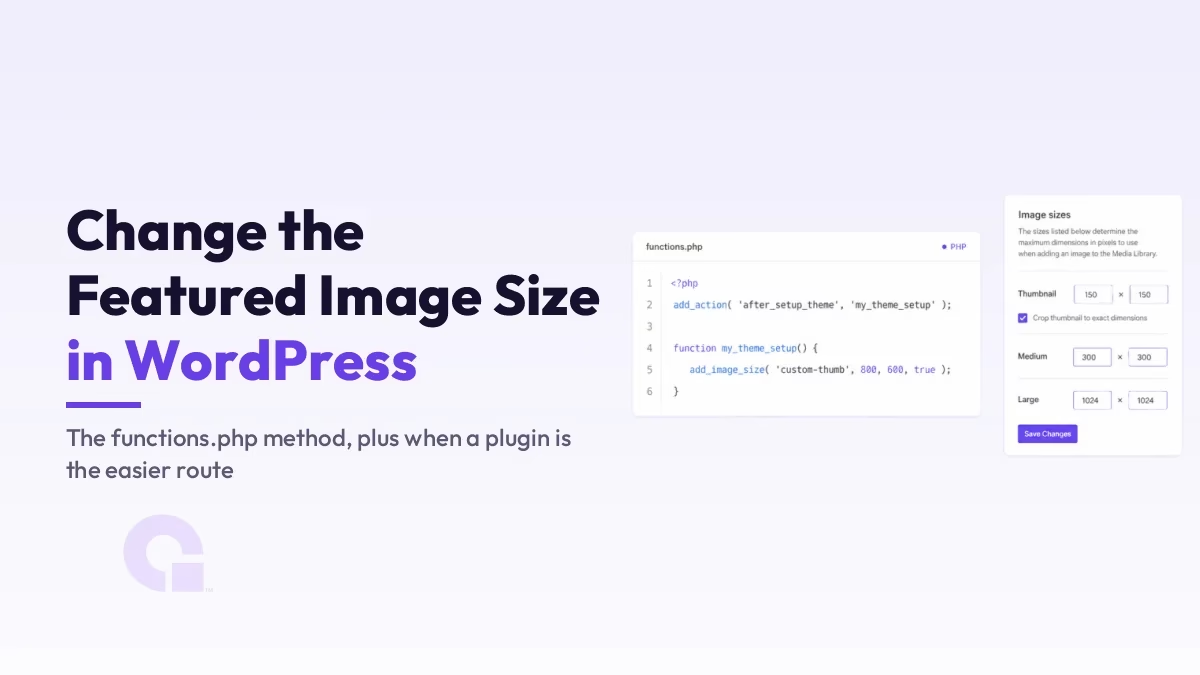
Step 1: Register a custom size in functions.php
Add a new image size in your theme’s functions.php (use a child theme so an update does not wipe it). This tells WordPress to generate that size for every new upload. The function is documented in the WordPress developer reference.
add_image_size( 'featured-large', 1200, 675, true );That last parameter is the one that matters most. With true, WordPress hard-crops the image to exactly 1200 by 675, so it always fills the frame but may trim the edges. With false, it scales the image to fit within those bounds and keeps the original aspect ratio, so nothing is cut but the dimensions are not guaranteed.
Step 2: Display the new size in your template
Registering the size is only half the job; you also have to tell the theme to use it. In a classic theme, find where the featured image is output (often single.php) and pass your new size name to the_post_thumbnail().
the_post_thumbnail( 'featured-large' );On a modern block theme there is no single.php to edit. Instead, open Appearance then Editor, edit the single-post template, select the Featured Image block, and set its dimensions there. It is the same idea, just done visually rather than in PHP.
Step 3: Regenerate your existing thumbnails
Here is the step people miss. A new registered size only applies to images uploaded after you added it, so your existing featured images will still use their old dimensions. To apply the new size to everything already in your media library, regenerate the thumbnails.
The simplest route is the free Regenerate Thumbnails plugin, which rebuilds all sizes in a couple of clicks. If you prefer the command line, wp media regenerate via WP-CLI does the same job without a plugin, which fits nicely if you are keeping the build lean.
Prefer not to touch code?
The code method gives you the most precise control, and I lean on it for client sites. That said, if you are not comfortable editing functions.php, a featured-image or image-size plugin can register and apply a custom size from a settings screen, and for a one-off change that is a perfectly reasonable trade. Just remember it is one more plugin to keep updated, so I only reach for it when code is genuinely off the table.
So what is the cleanest way to change it?
If this were my site, I would register the size with add_image_size(), call it in the template, and then regenerate thumbnails, because that gives a consistent featured size across every post with no extra plugin running in the background. It is three steps, but they are the steps that actually stick.
Reach for a plugin only if editing code is off the table for you, and whichever path you choose, do not skip the regeneration step, since that is the one that makes the change show up on the posts you already published.
Update Logs
01 Jul 2026
- Reworked into a clear three-step method (register, display, regenerate), added the Settings > Media misconception, block-theme Site Editor instructions, and a WP-CLI alternative to the plugin.
Want our posts to show up more often on Google?
One step & Google will surface this site in your Top Stories.